Showing posts with label crafts. Show all posts

Monday, October 18, 2010

Cool Camera Technique

I just found the website Kevin and Amanda and they posted the coolest idea ever about how to make a custom filter for your camera. Now, the thing is you must be using a manual, old school looking camera. No point and shoot fit in your back pocket camera. What it does is takes the light score ( a Christmas tree would be perfect) and makes it show up in different shapes. I love the hearts and snow flakes. There are step by step instruction here and I would love for one of photog friends to try this. I am looking at you Katie...can we try this the next time we hang out?!! I just love this, it is just so sparkly and fun.

Friday, October 1, 2010

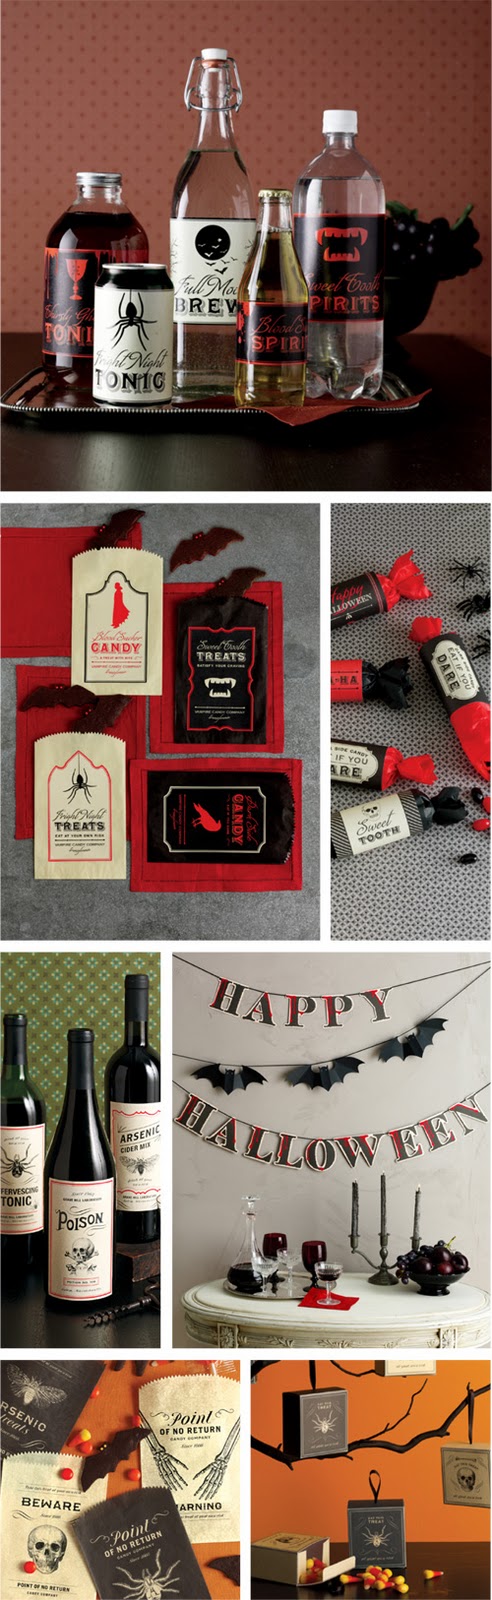
Martha Stewart does Halloween


Halloween falls on a Sunday this year and if you happen to be having a wedding on Friday, Saturday or Sunday I would in most cases be totally turned off if you made it Halloween themed and taped paper bats to the wall and had little plastic spiders and pumpkins everywhere. BUT, if you happen to style your wedding after some of the goodies above by Martha Stewart then I would ask you so kindly to please invite me.

Tuesday, August 17, 2010

DIY beauty


Rachel, over at Austin Wedding Blog has come up with  25 amazing budget friendly wedding projects. I am just in love with this necklace that I might one day over the rainbow try to craft up for my self. I am in desperate need of a statement necklace and this might just be the ticker. Rachel always finds the best things. Clink here for step by step directions.

Wednesday, July 7, 2010

doily come back!

Soo simple, yet so perfect. Its a name card and table decor in one. Simply place a clear glass plate or charger over a 12" doily with your guest's name written on it and your done. I love it.

( Via Martha Stewart )

Friday, July 2, 2010

4th of July by Twig & Thistle

Fabulous and I mean fabulous 4th of July decor and dessert idea from the one and only Twig & Thistle. I could not pass up sharing these ideas with you all. For free template download click here and full dessert instructions click here. Have a great holiday!!! Thanks T&T!!

Wednesday, June 23, 2010

great idea!!

doilies plus a sting of lights = doily light garland
so easy, yet so beautiful!!!

Monday, May 24, 2010

extra little touches

It is the little touches that make the biggest differences. This little crafty idea by Martha is super easy and super cute and would be great for a backyard wedding. All you have to do is download this butterfly template (for free!) and get some pretty paper and then trace. After you cut the butterfly out just make two little slits in the center of the butterfly and then slide a straw thru it. Thats it. Your Done.

Thursday, May 13, 2010

Just in love....


I check out Twig & Thistle everyday when I wake up. It is one of my favorite blogs and well yesterday I can't even explain to you how happy I was to see this post. My brother is getting married in June and I have been helping with the planning and design of the Rehearsal Dinner. I was thinking that it would look really cool to have the name cards in the shape of book marks and then we would place river rocks in the center to keep them in place on top of the napkin. The Rehearsal dinner is going to be held on a dock so I did not want to use the typical tent card in fear that it might fly away. Well, these were just thoughts in my heard and to wake up and find just about the same idea all laid out in front of me made me sooo happy. It was a total visual for the Bride and my Mom to see. T&T takes the best photos and you know what else...if you, my internet friends wanted to do this too, you can...for free. You can download the template and see more detailed instruction and pictures here. Thanks T&T for making my vision seem so much more attainable.

Thursday, May 6, 2010

Twig & Thistle goodness!

I am just so impressed with this little craft/food project that Twig & Thistle posted about the other day. T&T has the best ideas and I think this fabric wrapped cheese treat would just be the best for a tea party, a bridal shower or any time. Its is just so sweet and clever and there is cheese and I love cheese. To see complete instructions just head over to T&T and there are pictures to lead you thru the process step by step. Yummmmy!

Friday, April 2, 2010

Easter delight.....


The Wedding Style Guide has some charming Easter style decorations and a yummy recipe for little lemon bundt cakes. Also, the invitation and place card tags are a free to download so your Easter celebration can be even better. So Hop along to their website and create away. I am here in Virginia with my family and best friend Eliza and am so looking forward a weekend of laughter and good food and fun!
Free downloads link here.

Happy Spring everyone and have a nice holiday!

Tuesday, February 9, 2010

Sparkle Sparkle


Isn't this color scheme and theme just beautiful. Stars, glitter, sparkle, pink, rose and champagne. Pretty, Pretty indeed. What a wonderful wedding look. I love it all. All these wonderful ideas from Ms. Martha Stewart.

1. Star invitations
2. Star Lanterns (just glitter them yourself)
3. Star Decorations ( you can make them on your own or order them here and then add lots of glitter- make sure to tape them securely to the floor.)
4. Glitter Stars in various sizes ( you can get the glitter for these and the rest of the projects from Michaels.)
5. Glitter ballet slippers- to make, mask off non-glitter areas with tape, apply white glue with a paintbrush, then shake on the glitter.
6. Champagne Jello with fresh whip cream- use a Rose Champagne for pink colored Jello.
7. Glitter Bonbons and Gold-bottom acetate candy box (T111), U.S. Box Corp

Friday, February 5, 2010

Templates


Martha Stewart is so giving. You can download the templates for both of these designs and many more off of her website. She is just so nice.  It is the little things that make all the difference.

Tuesday, December 15, 2009

Ornament fun!


Twig & Thistle posted this today and I felt it needed to be shared right away. Its a wonderful winter wedding place card/favor idea and would also work great for any holiday parties that you might be throwing. You can download this black and white template on T&T Etsy website for $4 and print it on any color card stock.
All you’ll need is an ornament, then simply print, cut and secure with a ribbon and you’ve got instant table decor! And at just $4 for the template it’s affordable too! *Tip: For an extra touch, hand write names on the ribbon with a fabric pen and they double as place cards!
Thanks Twig & Thistle for always having the BEST ideas!

Friday, December 11, 2009

Thanks!


Nothing is better than getting a real letter in the mail. Thank you notes with some actual thought and love are even more awesome. These little Thank You Envelope Seals add that little touch that makes the letter even more special and maybe even the letter a little easier to write. Now you have something to look forward to using at the end when the letter is all finished. Sometimes its the little things that help....!

Monday, November 30, 2009

"Heartfelt HOLLY"


Here is a great idea for all you December Brides brought to you by the one and only Martha Stewart. Why not make these felt holly corsages as name tages for each place setting or you use them to decorate gifts for your loved ones. You could even attach one to a barrette and jazz up your holiday do! Since your making them, you can pick the color and the amount of bling you want to add. So craft away brides and holiday crafters.
Directions are below or clink on this link!


Step 1

Print the template, and cut out. From a piece of felt, cut one 2 1/2-by-5-inch rectangle for each pair of leaves. Fold rectangle in half lengthwise.
Step 2 Crease with an iron set to "wool." With the rectangle still folded, trace the template and cut out the shape using scissors. Unfold. To make the 4-leaf design, cross 2 felt shapes; using a low-temperature glue gun, attach at the center. For the 2-leaf version, dab glue at the center of 1 felt shape, and fold, angling the leaves


Step 3
Glue desired trimmings to the front and a bar pin or a barrette to the back.

You may also like

Related Posts with Thumbnails